Saturday, 5/19/2018,
Mt Buller – Smith-Dorrien/Hwy742, Spray Valley PP, Kananaskis, AB
· Round Trip 10km; Elevation:
2822m; Elevation Gain: 1033m; RT Time: 6:50 hrs (10:05-16:55), ascent – 3:15hrs,
descent – 2:05hrs; Moderate scramble with steep slope, loose scree, and long
slab
Drive
From Calgary, drive
west on Hwy 1 for about 88km and take the #89 exit for Canmore. Turn right at
STOP Sign and YIELD sign separately, cross Hwy 1 on Benchlands Trail, then
drive on Railway Avenue until 8 Street, turn left here onto 8 Street. Keep
driving west until a four way stop intersection, and turn left onto 8 Avenue for
about 240meters, turn right onto Bridge Rd. after crossing Bow River on a
bridge, turn left at a T Junction, then turn right onto Smith-Dorrien Trail /
Hwy 742 for about 33 km to Buller Mountain parking lot. Driving time would be
around 1:45 hour.
Hike
Knowing Mt Buller is good to go from other’s trip video plus
the excellent forecast weather, we quickly chose it as our first target of the
May long weekend and were very happy that we didn’t need to stick to the Front
Range anymore.
From trailhead, we crossed the
first bridge and hiked up Buller Pass trail for about 3 km just before the third
bridge. We then turned left picking up a faint trail on the right side of a
small creek and followed it up. When we faced a slab ahead, we probably should
go left to another gully we used for descent. Instead, I went up the steep
grass slope on the right side of the slab while Gua used the slope on left.
Since there were footprints and faint trails here and there, we decided just
followed it up to avoid those heavy bushes then traversed left to the correct
drainage. However, we went up too much, and had to do some steep side-sloping to
reach the drainage below the col. Once on the correct drainage, it was a quick
slog to the col. After a short break on the col, we followed one of several
trails on a wide scree slope up and eventually reached the first slab. We
avoided this first steep slab covered with scree by walking on a rock strip to
its right, but walked the rest of them directly. Basically, the grip was great,
but the lower part of my calf felt tired since the slab was a bit too long for
me. After the slabby section, it was just a couple minutes ridge walk to the
summit.
We spent more than one hour to take
photos and enjoy the spectacular views to all directions and then retraced our
steps down to the col. From the col, we descended the drainage covered with
good snow to speed up a bit. When the last one third of the drainage became
unpleasant, we went down the left side of it and eventually joined the initial
part of our ascent route back to the Buller Pass Trail.
My Route

From trailhead, cross the first bridge and hike up Buller Pass trail

Second bridge
This might be the small trailside clearing that Alan Kane mentioned in his book
Before the third bridge, leave Buller Pass Trail and turn left

Pick up a faint trail on the right side of a small creek and follow it up
The slopes on either side of this slabby area are quite steep
Scrambling up the slab
I went up the steep grassy slope on the right side of the slab
Since there were footprints and faint trails here and there, we decided just followed it up to avoid those heavy bushes
Then traversed left to the correct drainage
Doing some steep side-sloping to reach the drainage below the col
On the correct drainage
Looking back down
Views from the col. The Tower(CL,B) and Mt Engadine(CR,F) to the south
Mt Birdwood(L), The Fist(CL), and Mt Smuts(CR) rise over Tent Ridge
Mt Nestor and Goat Mtn in the centre to the northwest
After a short break, we followed one of several trails up on a wide scree slope.
The view unfolded little by little behind us as we went up


Quite steep and loose
Avoiding the first steep slab covered with scree by walking on a rock strip to its right
But scrambled up the rest slabs directly. Basically, the grip is great if avoiding the small rock on the top

Looking back. Using hands would be essential

Easy slab without scree covering
After the slabby section, it was just a couple minutes ridge walk to the summit

Standing on the summit of Mt Buller

E-SE

S-SE

S-SW

W

NW

North-northwest
northeast
east

From trailhead, cross the first bridge and hike up Buller Pass trail

Second bridge

This might be the small trailside clearing that Alan Kane mentioned in his book

Before the third bridge, leave Buller Pass Trail and turn left

Pick up a faint trail on the right side of a small creek and follow it up

The slopes on either side of this slabby area are quite steep

Scrambling up the slab

I went up the steep grassy slope on the right side of the slab

Since there were footprints and faint trails here and there, we decided just followed it up to avoid those heavy bushes

Then traversed left to the correct drainage

Doing some steep side-sloping to reach the drainage below the col

On the correct drainage

Looking back down

Views from the col. The Tower(CL,B) and Mt Engadine(CR,F) to the south

Mt Birdwood(L), The Fist(CL), and Mt Smuts(CR) rise over Tent Ridge

Mt Nestor and Goat Mtn in the centre to the northwest

After a short break, we followed one of several trails up on a wide scree slope.

The view unfolded little by little behind us as we went up


Quite steep and loose

Avoiding the first steep slab covered with scree by walking on a rock strip to its right

But scrambled up the rest slabs directly. Basically, the grip is great if avoiding the small rock on the top

Looking back. Using hands would be essential

Easy slab without scree covering

After the slabby section, it was just a couple minutes ridge walk to the summit

Standing on the summit of Mt Buller

E-SE

S-SE

S-SW

W

NW

North-northwest

northeast

east

Zooming in

A bird flying over Fisher Peak


Mt Birdwood(L,B) and Mt Smuts(CR,B) beyond Pig's Tail(L,F), The Fist(C), and Tent Ridge(C,F)

Mt Smuts(L) and Mt Shark(R)

Eon Mtn(L), Aye Mtn(CL) and Mt Assiniboine(CR)

The distant Mt Temple(C)

Big Sister

Mt Sparrowhawk

Mt Bogart

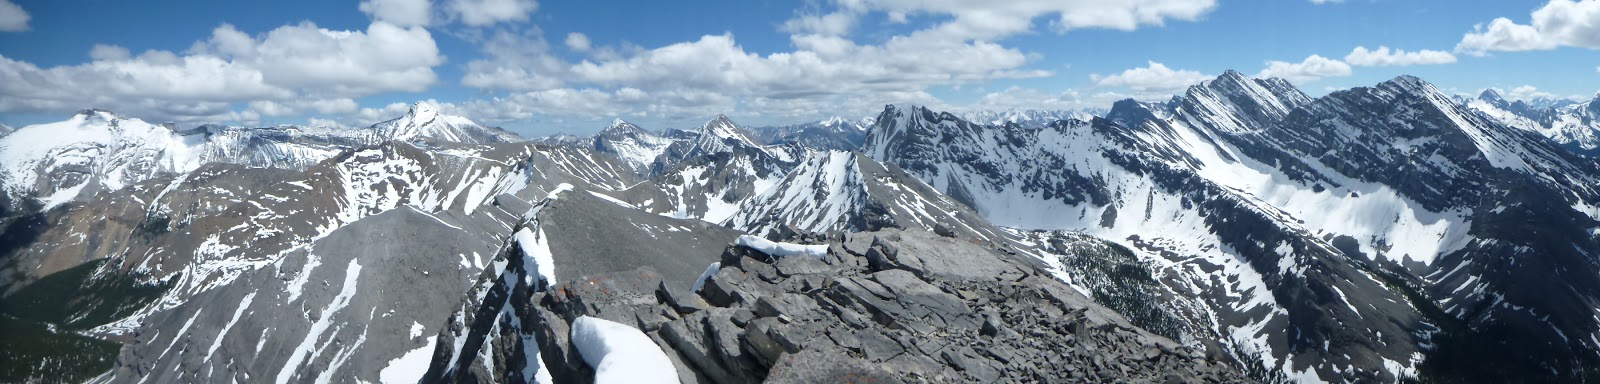
A pano (NE-E-S) from the summit of Mt Buller
Fisher Peak

A pano (SW-W-N) from the summit of Mt Buller

A pano (NW-E-S) from the summit of Mt Buller

Eon Mtn(L), Aye Mtn(CL) and Mt Assiniboine(CR) again

Mt Ball towers above other peaks

Leaving the summit of Mt Buller

Carefully negotiating the mixture of scree and slab

A short scree run on the left side of the slab

Descending the steep slab

Good scree for quick descent

Looking up at the col after a quality scree-run

Traversing right to avoid the upper steep and snow-filled gully

Descending on the left side of the gully

Taking advantage of the snow when the angle eases a bit

When the last one third of the drainage became unpleasant, we went down the left side of it and eventually joined the initial part of our ascent route

Back to the Buller Pass Trail

A ptarmigan blocking our way

Back to the trailhead

The end.
No comments:
Post a Comment